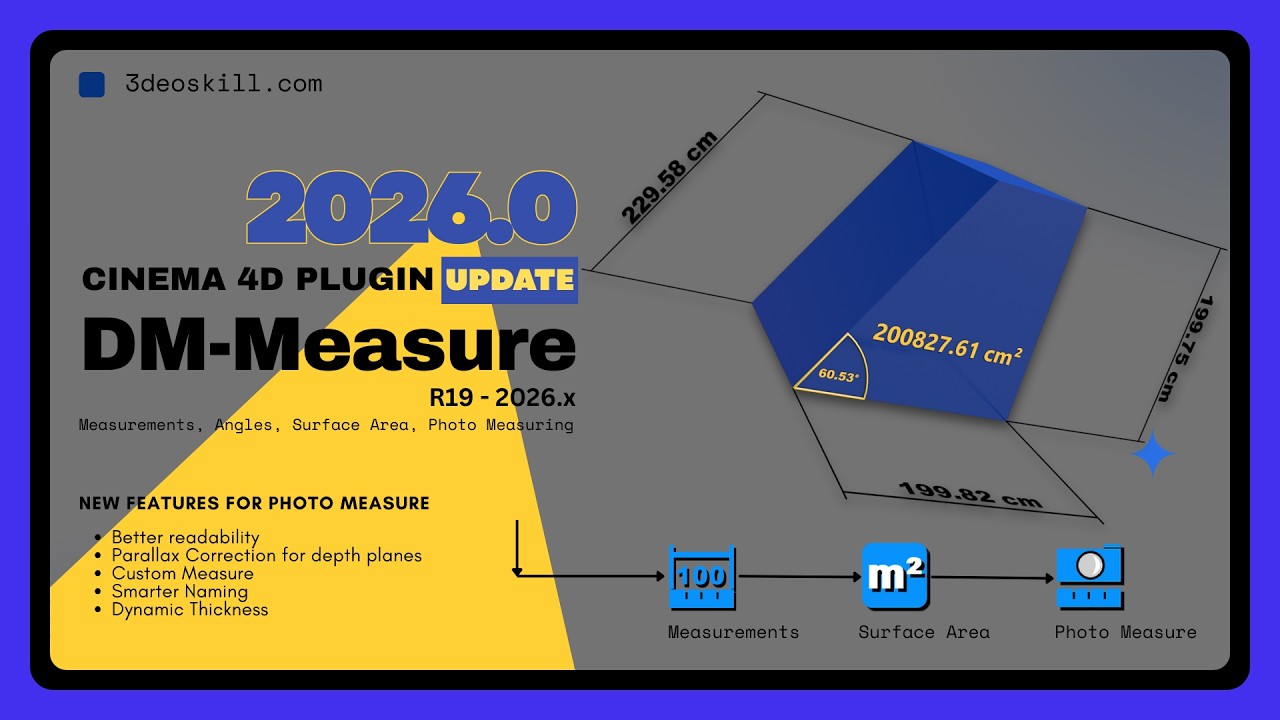
DM Photo Measure
DM-Photo Measure Manual
(This manual will be completed in the future.)
Photo Measure (PM) is a Tool Plugin which is bundled with the DM-Measure plugin and helps you quickly and efficiently measure photos.
Let’s say you want to recreate a building in 3D. You’ve taken some photos of your desired object. To recreate it as accurately as possible, you need a lot of measurements. Often, most areas of the building are inaccessible, or you only have reference images available.
With PM, you have photo measurement directly in Cinema 4D. Fast, efficient, and without any unnecessary features or complicated apps.
It’s not 100% accurate, but it can save you a lot of work and time.
PM was recently updated and has received some new features and improvements.
Video Tutorial
Installation
- Download the DM Measure Plugin
- Unpack the Zip File and copy the folder which corresponds with your Cinema 4D version into the plugin folder in “App Data/Roaming…../Plugins”. Do not install DM-Measure into the C:/Program Files…..because you don’t have writing permissions.
- Delete all previous versions of DM Measure.
Overview
- To work with PM, it’s recommended to create a new scene.
- It’s advisable to pin the tool somewhere in the interface for quick access.
- When you activate the tool, the editor view switches to the Front-View by default
- The document switches to edit (points) mode
- A new render preset is created because the tool uses the Standard Renderer. For a few measurements, we don’t need complicated Redshift node setups.
Short Description
PM has two nodes: Picture Mode and Floor Plan Mode.
The only difference between the two nodes is that Floor Plan Mode uses the Top-View instead of the Front-View. Ultimately, it’s up to you which mode you prefer.
Interface
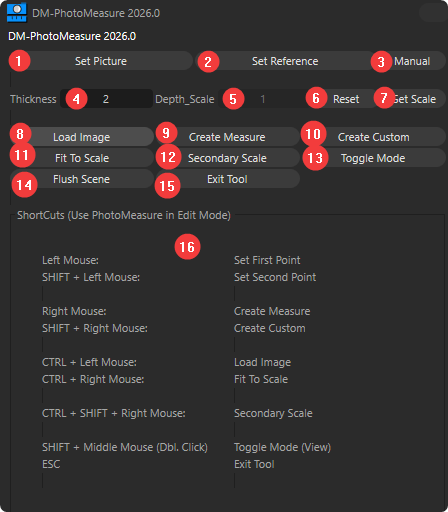
1. Set Picture
When you load a saved scene created with PM, the tool loses its reference image. Selecting the reference image, activating the tool, and clicking “Set Picture” restores the reference. Without a reference image, measurements are not possible, and some other functions are unavailable.
2. Set Reference
If both points are set, this command generates a new measurement with a striking green to mark it as a reference measurement. This measurement has no material, only the editor and render color is set.
3. Manual
This command opens the PM user manual.
4. Thickness
A real number used to determine the line thickness. It must be set before taking a measurement. This allows you to assign different line thicknesses to different measurements. The line thickness also proportionally affects the font size.
5. Depth_Scale
The Depth_Scale value is a factor. It is needed to later measure at different depth levels and to correctly convert the measurement due to parallax shift. With a factor of 1, no conversion of the measured distance takes place. See also No. 12 (Secondary Scale). The value is generated automatically.
6. Reset
This command resets the Depth_Scale factor to 1. No further conversion takes place. If you have already scaled your image to scale using Fit to Scale command and created a reference measurement, for example, then you are back at this level.
7. Set Scale
If you want to measure at a specific depth-level again, select the desired measurement in the Object Manager, open the tool, and execute the Set Scale” command. The Depth_Scale factor will then be reset to the value, and you can immediately continue working at the desired depth.
8. Load Image
One of the most important commands. This loads an image into the scene. The image is projected onto a plane, and the plane’s proportions are adjusted to match the image. Note, however, that the image is most likely not yet at the correct scale. See also 11. Fit To Scale and 2. Set Reference.
9. Create Measure
Once both points are defined, this command creates a new measurement. If it is the first measurement, a color dialog box opens for color selection. A default material is created in this color. This material is used for all measurements and has a specific name.
- Naming Convention of a basic Measurment: “
30.23 (1.024)”
The value in parentheses is the Depth_Scale factor. If the factor is not 1, you automatically know that you’ve worked on a secondary scaled depth level. See also 12. Secondary Scale.
10.Create Custom
This command opens an input dialog where you can enter a custom size. Sometimes you might want to visualize specific values correctly or add further descriptions.
Let’s say you’ve created a measurement and it’s 30.234 in length. But for modelling purposes you only want to use even numbers for simplicity. Therefore you use the Create Custom command and create a custom measurement, for example 30. Sometimes you might also want to add descriptive notes; these will also be added.
However, the created name in the OM of the measurement has a useful recognition value.
- Naming Convention of Custom Measurments: “
Your Input (C) (orig. 30.23) (1.02434)”
The (C) immediately identifies it as a custom measurement, and (orig) value after it shows the actual length you measured, followed by the Depth_Scale factor. If the factor is not 1, you automatically know that you’ve worked on a secondary scaled depth level. See also 12. Secondary Scale.
11. Fit to Scale
This command is only available once you have loaded an image with the 8. Load Image command or if you have lost the reference to the image and used the 1. Set Picture command.
This command scales the image (plane) to a size based on a reference dimension you specify. Let’s say you took a photo of the front facade of a building. You were on-site and, for example, measured the height of the entrance door.
You now place your two Measure-Points on the door in the image and call up 11.Fit to Scale. Here, you enter the height of the door that you know. You can type either integer or decimal numbers. (For decimal numbers either: 3.2 or 3,3)
The image is then scaled correctly based on your input so that the door in the image actually has this height. This is the reference level. It’s best to then to set the Measure-Points at the door again and create a measurement using 2. Set Reference so you can immediately see what measurement you used as reference and on which depth-level it was located.
12. Secondary Scale
When you photograph a facade from the front, for example, you often have areas of the wall that are further back or forward. If you’ve measured a door using function 11. Fit to Scale, you can only measure at that depth level to ensure accurate measurements. However, if you then want to measure something on a wall that’s further forward or backward, you’ll encounter parallax shift. A known dimension will appear smaller when it’s further back and larger when it’s further forward. To compensate for this, you need another known or estimated dimension. You place the measurement points at this location and then call function 12. Secondary Scale. Now you enter the known dimension. Your measurement will then be converted using a Depth_Scale factor. It is immediately visible in the Editor-View. This factor is also entered in 5. Depth_Scale. Now you can create measurements that are at this depth level.
13. Toggle Mode
PM has two modes: Picture Mode and Floor Plan Mode.
The only difference between the two modes is that Floor Plan Mode uses the Top-View instead of the Front-View. Ultimately, it’s up to you which mode you prefer.
Basically, it’s designed so that when measuring images, you work in Picture Mode (front view), and when measuring floor plans, you use FloorPlan Mode (top view). This command lets you switch between modes. You’ll switch to the respective view, and the image will be rotated and the internal calculations will be different.
Note: If you’ve already taken measurements, for example, in Picture Mode, these won’t be correctly visible from above. Therefore, you should decide beforehand which mode you want to use for your measurements.
14. Flush Scene
This command quickly deletes all measurements, materials and the reference imgage from the scene.
Once you’ve measured and rendered a Measure-Setup and saved the scene, you don’t want to have to manually delete everything or start a new scene. Use Flush Scene to immediately begin a new measurement on a new image.
At the moment it doesn’t delete the custom render preset.